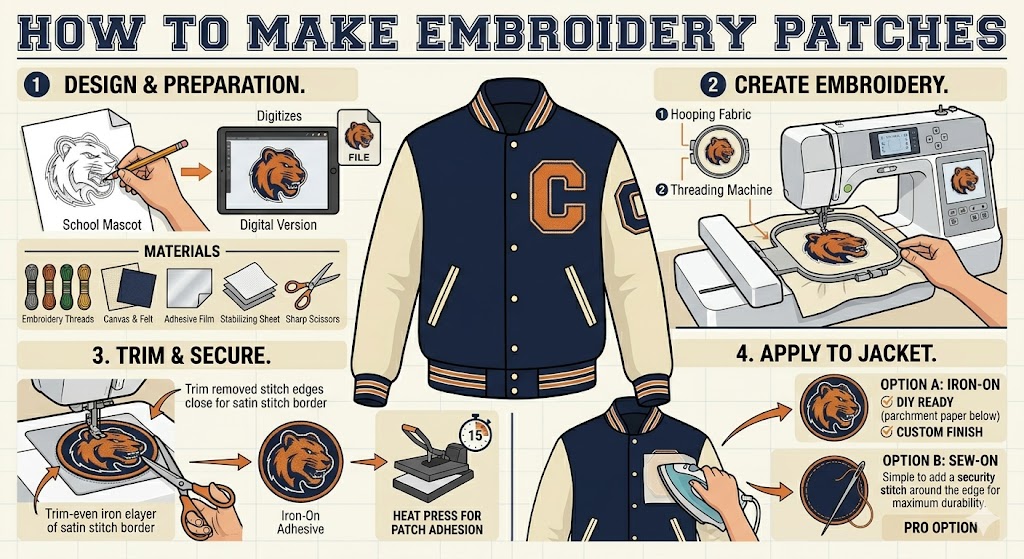
How to Make Embroidery Patches: A Complete Step-by-Step Guide
Embroidery patches are a popular way to customize clothing, bags, hats, and varsity jackets. They add a professional look while allowing individuals, teams, and businesses to showcase logos, names, and unique designs. Whether you’re creating patches for personal use or starting a patch-making business, understanding the process can help you produce high-quality results.
What Are Embroidery Patches?
Embroidery patches are fabric-backed designs created by stitching thread onto a base material. They can feature logos, text, symbols, mascots, and artwork. Once completed, patches are attached to garments using sewing, heat-seal backing, Velcro, or adhesive.
Materials Needed to Make Embroidery Patches
Before starting, gather the following supplies:
- Embroidery machine
- Embroidery digitizing software
- Twill or felt fabric
- Embroidery thread
- Embroidery stabilizer
- Embroidery hoop
- Scissors or patch cutter
- Heat-seal backing (optional)
- Sewing machine (optional)
Step 1: Create or Choose a Design
The first step is selecting a design for your patch. Popular patch designs include:
- Company logos
- School emblems
- Sports team logos
- Names and initials
- Mascots
- Military-style patches
Keep the design simple enough to embroider clearly while maintaining visual appeal.
Step 2: Digitize the Artwork
Embroidery machines cannot read standard image files directly. The design must be converted into an embroidery file using digitizing software.
Digitizing involves:
- Defining stitch types
- Setting stitch directions
- Assigning thread colors
- Determining stitch density
Popular embroidery file formats include:
- DST
- PES
- EXP
- JEF
A properly digitized design is essential for producing a clean and professional patch.
Step 3: Prepare the Fabric
Most embroidery patches are made using:
- Twill fabric
- Felt fabric
- Polyester patch material
Place the fabric on top of an embroidery stabilizer and secure it tightly in the embroidery hoop. Proper tension helps prevent shifting during stitching.
Step 4: Load the Design into the Embroidery Machine
Transfer the digitized design to your embroidery machine using:
- USB drive
- Wi-Fi connection
- Direct software transfer
Check:
- Thread colors
- Design size
- Hoop placement
Running a test stitch before production can help identify any issues.
Step 5: Stitch the Patch
Start the embroidery process and monitor the machine throughout the run.
The machine will:
- Stitch the design outline.
- Fill embroidery areas.
- Add text and details.
- Create the border.
Depending on complexity, stitching can take anywhere from a few minutes to over an hour.
Step 6: Create the Patch Border
The border is one of the most important parts of an embroidery patch.
Common border types include:
Merrowed Border
A thick stitched edge that wraps around the patch. This is the traditional border used on most patches.
Benefits:
- Professional appearance
- Durable finish
- Prevents fraying
Heat-Cut Border
The patch is cut precisely along its shape, allowing for custom designs and intricate outlines.
Benefits:
- Greater design flexibility
- Modern appearance
- Ideal for custom shapes
Step 7: Cut Out the Patch
After embroidery is complete, remove the patch from the hoop and trim excess fabric.
You can cut patches using:
- Fabric scissors
- Rotary cutter
- Laser cutter
- Patch-cutting machine
Careful cutting helps achieve clean and professional edges.
Step 8: Apply Patch Backing
Different backings are available depending on how the patch will be attached.
Sew-On Backing
The most durable option.
Advantages:
- Long-lasting attachment
- Suitable for jackets and uniforms
- Easy to repair
Iron-On Backing
A heat-activated adhesive allows the patch to be attached using a household iron or heat press.
Advantages:
- Quick application
- No sewing required
Velcro Backing
Commonly used for tactical, military, and work uniforms.
Advantages:
- Removable
- Reusable
- Easy to switch patches
Adhesive Backing
Temporary peel-and-stick backing.
Advantages:
- Fast installation
- Ideal for temporary use
Step 9: Quality Inspection
Before using or selling patches, inspect them carefully.
Check for:
- Loose threads
- Color accuracy
- Stitch consistency
- Clean borders
- Correct dimensions
Quality control ensures a professional final product.
Tips for Making High-Quality Embroidery Patches
Use Premium Thread
High-quality embroidery thread produces brighter colors and better durability.
Keep Designs Simple
Overly complex designs may lose detail when stitched.
Choose the Right Fabric
Twill is one of the most popular patch materials because it is durable and easy to embroider.
Test Before Bulk Production
Always create a sample patch before producing large quantities.
Maintain Your Embroidery Machine
Regular cleaning and maintenance help prevent thread breaks and stitching errors.
Popular Uses for Embroidery Patches
Embroidery patches are widely used for:
- Varsity jackets
- School uniforms
- Sports teams
- Motorcycle clubs
- Corporate branding
- Military uniforms
- Fashion apparel
- Hats and backpacks
Custom patches allow organizations and individuals to display their identity and achievements in a stylish way.
Why Embroidery Patches Are Popular for Varsity Jackets
Varsity jackets and embroidery patches go hand in hand. Traditional letterman jackets often feature embroidered patches that represent:
- School letters
- Sports achievements
- Graduation years
- Team logos
- Academic honors
At LettermanJacketCustom, embroidered patches help create personalized varsity jackets that celebrate accomplishments and showcase individuality.
Conclusion
Learning how to make embroidery patches is a valuable skill for hobbyists, apparel businesses, and custom clothing brands. The process involves designing artwork, digitizing the design, embroidering it onto fabric, creating a border, and applying the appropriate backing.
Whether you’re producing patches for varsity jackets, sports teams, businesses, or fashion brands, high-quality embroidery patches offer durability, customization, and a professional appearance that never goes out of style.